Virtualization, Virtual Machine, or System Emulator, is a feature that allows you to have another operating system running inside your original one, as if you were using another computer, whether it has Windows or Linux installed. However, there’s a big problem with this software: it doesn’t use the full power of your hardware like a normal PC does.
To get around this, you can use Hardware Virtualization. Here, you enable your PC’s resources so that they can also be used by the virtual machine. This way, it will take advantage of them, just as the native system does, but in an isolated environment created with the resource.
And today Globe Live Media is going to explain to you what Hardware Virtualization is and how you can activate it on your computer. Check it out!

Nowadays it’s common for companies to create virtual machines within a single PC
What is Hardware Virtualization?
Unlike ordinary virtualization, hardware virtualization – as its name suggests – is aimed at those who are looking for high performance when creating a virtual machine.
In other words, using the common system emulation procedure, an optimized version is usually created, as if it used less powerful components, such as an inferior processor.
In Hardware Virtualization, the virtual machine created has direct access to its native components, i.e. it uses its processor, RAM, video card and other components in a similar way to a normal PC.
With it, you can have more performance when creating your environments, especially for more specific tests that demand more from your CPU.
What are the advantages of Hardware Virtualization?
There are many advantages to applying Hardware Virtualization, but the main one is the possibility of carrying out tests in a protected environment that won’t compromise your main operating system.
For example, in a virtual machine, you can run a certain type of software without it corrupting your Windows data. So, if it has any serious execution problems, simply remove the emulated system and create a new one to continue the experiments.
Another important factor is economic. This is because it is quite common for companies to invest in virtual machines to store several servers on a single piece of hardware. In other words, they invest in a single, robust PC so that several servers can be created inside it, sharing the same components.
The same goes for the average user, who instead of sharing their login with other people in the house, can create virtual machines for themselves. The feature is an additional alternative, especially for parents who want to have greater control over what their children do on the PC.
Not to mention that this way, there’s no risk of deleting or changing a system setting that could compromise the main Windows.
How do I activate Hardware Virtualization?
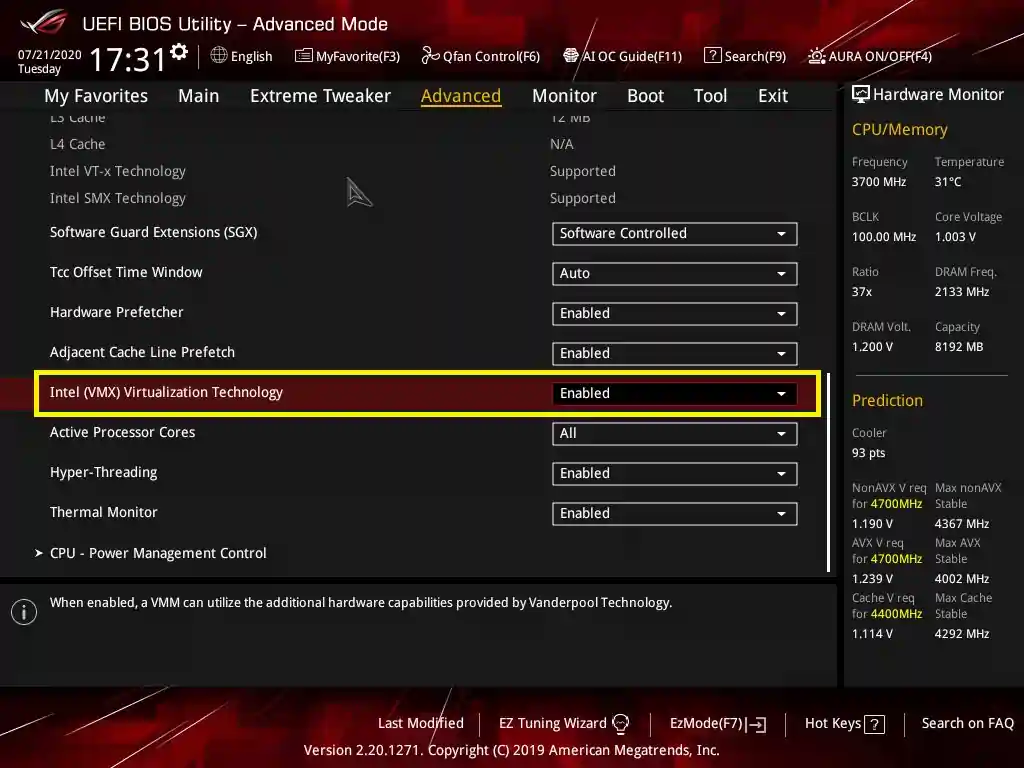
Hardware Virtualization needs to be activated in your motherboard’s BIOS, i.e. on the screen that precedes system startup. It’s important to remember that, due to the different types of motherboard and processors, the path may vary slightly, especially in terms of nomenclature:
1. turn on the computer and enter the “BIOS Settings” section. To do this, hold down the F2 key (F1 on some models) while the PC is turning on, and only release it when the menu appears on the screen;
2. Once there, look for the “CPU Settings” option or “CPU Configuration” if the menu is in English;
3. Next, look for “Virtualization Settings”. These are also called “Virtualization Configuration”;
4. Now, you need to pay attention because the option to enable Virtualization varies according to the model. However, in all cases, simply set the option to “Enabled” to enable the feature. These are
- AMD processors – “AMD SVM Mode”.
- Intel processors – “Virtualization for Direct-IO (or VT-d)”;
- Dell PCs – “Virtualization”.

5. Next, make the command to “Save and Exit”, which also varies in paths and shortcut keys for each version;
6. Simply turn your PC back on and the Hardware Virtualization option will be activated.
Now that you know how to use Hardware Virtualization and its benefits, you can create more powerful Virtual Machines that make better use of your computer’s components.
Do you have any questions? Tell us on the comments section and keep an eye on the portal to keep up to date with the world of technology and innovation!

